12.2 NextJS Routing
# NextJS Routing
Last module we talked about the idea of having folders for different routes, plus a few of the special file names that have predefined functionality.
NextJS - Convention over Configuration
NextJS expects developers to follow naming conventions for files and folders, not create settings files, when building their web app.
Now, we will do a deeper dive and discuss more of the routing conventions.
File Conventions reference (opens new window)
NextJS includes server-side code that runs through NodeJS. This server-side code handles the routes for the website. Nearly every folder that you create inside of the /app folder will become a
route. You merely need to add a file called page.jsx inside every folder that you want to be a route.
NextJS - Just Like Express
NextJS apps can be thought of like an Express app. Just like in MAD9124, you are building a server-side application with endpoints.
In NextJS, the endpoints are either a page.js file or a route.js file.
Page.js files return HTML files.
Route.js files can return any file type (but typically return JSON).
Using the following folder structure as your project's /app/.
app
├── components
│   └── Person.js
│   └── Person.module.css
├── people
│   └── page.js
├── place
│   └── new
│   │    └── page.js
│   └── page.js
├── things
│   └── new
│   │    └── page.js
│   └── page.js
├── global.css
├── layout.js
└── page.js
2
3
4
5
6
7
8
9
10
11
12
13
14
15
16
17
When you run npm run dev, NextJS will create the following routes for your app. Each page.jsx file will be a web page at this end points. Folders, like components, that don't have a page.js or
route.js file will NOT be seen as a valid endpoint.
http://localhost:3000/http://localhost:3000/peoplehttp://localhost:3000/placehttp://localhost:3000/place/newhttp://localhost:3000/thingshttp://localhost:3000/things/new
Inside the components folder, there is no page.js file, so it will not become a route for the web site. The jsx files inside components are components that will be imported and used in the
various page.js files. If you try to visit the http://localhost:3000/components endpoint you will get a 404 error.
The global.css file will contain CSS styles which are used by every page and every component.
The *.module.css files are the CSS modules that will be imported by and attached to a jsx component.
# Dynamic Routes
When you are creating the folders inside /app, you are defining the paths that will be available for your website. Create a folder called /app/about with a page.jsx file inside and you have
created the local route http://localhost:3000/about. On an external host it will still be the path /about.
This is create if you know the names of every part of the paths. This is not always the case though. Sometimes the parts of path are ids for objects or product categories and names. Here are a few examples of where different dynamic paths would be useful:
/products/automotive/tires
/products/grocery/produce/lettuce
/movies/1234
/users/new
/users/543
2
3
4
5
With the first two endpoints, think of a store like Walmart. products would be the first folder. It's page.jsx file could display a search form, or maybe a grid of recommended or on-sale products.
The next part of the first two endpoints is a department value. Now, instead of creating an automotive folder and a grocery folder, we can create a single folder called [department]. The square
brackets are part of the name. Now, the actual URL can use anything as the second part of the path.
app
├── products
│   └── [department]
│   │    └── page.js
│   └── page.js
2
3
4
5
With this structure, the page.js file inside of [department] can access the value used as the department through the props object and its params property.
// /app/products/[department]/page.jsx

function Page({ params }) {
  //with the urls /products/grocery or /products/automotive
  //the value of params.department will be `grocery` or `automotive`
  const department = params.department;
}
2
3
4
5
6
7
When you want to be able to handle a dynamic number of path segments with a single file, then we could handle both of these routes /products/automotive/tires and /products/grocery/produce/lettuce.
Instead of calling the folder [department] we could use a name like [...category]. The square brackets and the three periods are part of the name. The params object will have a property called
category. In this case, the value of category will be an Array, not a String.
// /app/products/[...category]/page.jsx
function Page({ params, searchParams }) {
  //with the urls /products/grocery or /products/automotive/tires or /products/grocery/produce/lettuce
  //the value of params.category will be an array with 1, 2, or 3 items
  const category = params.category;
  const numSegments = category.length;
  //the searchParams object holds all the properties in the querystring
  /*
  ['grocery'] for endpoint /products/grocery
  ['automotive', 'tires'] for endpoint /products/automotive/tires
  ['grocery', 'produce', 'lettuce'] for endpoint /products/grocery/produce/lettuce
  */
}
2
3
4
5
6
7
8
9
10
11
12
13
The folder names with ... are known as catch-all routes. So, if you build this folder structure:
app
├── products
│   └── [...department]
│   │    └── page.js
│   └── page.js
2
3
4
5
Then you would have /products as a valid endpoint handled by /app/products/page.js.
The /app/products/[...department]/page.js file will handle any route that starts with /products/. Every segment of the path after it will become another value in the params.department array.
Now, you can create any folders that you want. Putting a route.js or a page.js file inside the folder makes it something that will return a response. A folder without either of those files will
still be part of the path but you will have an error if the user types an endpoint that stops at that folder.
There is a solution for this though. If you want to create a folder just to use to organize its sub-folders, then simply wrap the name with parentheses.
In the following example (places) will not be part of any URL. It is just a logical container to hold the ottawa and montreal folders. ottawa and montreal will be part of the URL. These are the
four urls for the following directory structure.
/names/things/ottawa/montreal
app
├── names
│   └── page.js
├── things
│   └── page.js
├── (places)
│   └── ottawa
│   │    └── page.js
│   └── montreal
│        └── page.js
2
3
4
5
6
7
8
9
10
# Client and Server Components
One of the big differences with a typical React application or a NextJS application version 12 or lower, and a NextJS application of version 13 or higher, is the separation of components into server-side and client-side rendering.
By default, pages and components will be rendered on the server. The rendered content will be sent to the browser. If you want you can add the use server directive at the top of any component to
make it clear that the component is being rendered on the server side. The directive is just a string on the first line of the file, like this:
'use server';
One advantage of server-side components is that there will actually be content in the HTML that is sent to the browser. This improves the SEO of the website.
If the content is already generated then not nearly as big a JavaScript bundle needs to be sent to the client, saving time, improving performance, and increasing search engine page rank.
If you have a server-side component and it is making fetch calls, then even more content is being built on the server, before being sent to the client. With server-side fetch calls, you can include things like private API keys in the code and they will never be sent to the browser, keeping them private.
If you need to work with the DOM and user interactions, on buttons or links, and submits, and clicks, then you need to use a client-side component. To mark a component as running on the client, add
the use client directive at the top of the component file.
'use client';
You can always nest client-side components inside of server-side ones, but not the other way.
# NextJS Built-in Components
There are several built-in components in NextJS that you can import and use in your page or component.
import Image from 'next/script';
import Link from 'next/script';
import { Lato, Merriweather } from 'next/font/google';
import Script from 'next/script';
2
3
4
The <Image> component is built with JSX and comes with a long list of available props including onLoad and onError which are functions that will be called when the image has finished loading, or
when there is a failure to load the image.
<Image src="/avatar.png" width={250} height={250} alt="User avatar" onLoad={(ev) => {}} onError={(ev) => {}} />
The <Link> component extends the HTML <a> element to provide prefetching and client-side navigation between routes. It is the primary way to navigate between routes in NextJS. You can pass either
a string or an object to the href property.
<Link href="/pageOne" prefetch={true}>One</Link>
<Link
  href={{
    pathname: '/pageTwo',
    query: { name: 'test' },
  }}
  prefetch={false}
>
  Two
</Link>
2
3
4
5
6
7
8
9
10
The prefetch attribute, if set to true, means that NextJS will prefetch the contents of that page, when the link appears in the viewport, in the background and hold it in memory until the user
actually navigates to that route.
The next/font component lets you use either Google Fonts or locally hosted fonts. Ideally you should use this in the layout.jsx. Any of the google fonts that you want to use can be imported as a
function through next/font/google. Call the imported function and it will return an object with a className property. You can use that in any JSX element as the value for a className attribute.
Typically this is done on the <html> element in the layout.jsx file.
import { Lato } from 'next/font/google';

const lato = Lato({
  weight: ['300', '500'],
  style: 'normal',
  subsets: ['latin'],
  display: 'swap',
});

export default function RootLayout({ children }) {
  return (
    <html lang="en" className={lato.className}>
      <body>{children}</body>
    </html>
  );
}
2
3
4
5
6
7
8
9
10
11
12
13
14
15
16
If you are using multiple fonts, you can import all the functions and call each of the functions to create a series of objects. This is usually done in a separate file called fonts.js inside /app/
and then imported.
If you want to use a local font, then import the localFont function from next/font/local.
import localFont from 'next/font/local';

// Font files can be colocated inside of `app`
const myFont = localFont({
  src: './my-font.woff2',
  display: 'swap',
});
2
3
4
5
6
7
Then call the localFont function to load the local font and create a className property to be used in the <body> element.
If you need to load an external script for a specific page within your site, and you only need it for a specific route, then you can import and use the NextJS component.
# Linking and Navigating
When building your NextJS app, the recommended approach is to use the <Link> component as described above.
NextJS uses partial rendering. Partial rendering means only the route segments that change on navigation re-render on the client, and any shared segments are preserved.
# Current Pathname and usePathname
When building your Links, if you want to compare their href against the current url, so that you can style the link as the current active page, then use the usePathname hook. It will return the
current pathname from the URL.
This is a client-side hook.
'use client';

import { usePathname } from 'next/navigation';
import Link from 'next/link';

export default function MenuBar() {
  const path = usePathname();

  return (
    <nav>
      <Link className={`link ${path === '/' ? 'active' : ''}`} href="/one">
        One
      </Link>
      <Link className={`link ${path === '/two' ? 'active' : ''}`} href="/two">
        Two
      </Link>
      <Link className={`link ${path === '/three' ? 'active' : ''}`} href="/three">
        Three
      </Link>
    </nav>
  );
}
2
3
4
5
6
7
8
9
10
11
12
13
14
15
16
17
18
19
20
21
22
If the value of the path variable matches the current pathname from the URL, then we are adding the active CSS className to the element.
# useRouter Hook for Programmatic Navigation
If you want to navigate to different parts of your app based on different user interactions, and you are not going to have a <Link> in the component, then you will want to use the useRouter hook.
useRouter is a Client Side hook
You can only use the useRouter hook on client-side rendered components.
This means adding the use client directive at the top of the file.
The useRouter hook will return a router object that you can use within any JavaScript function in your page or component. The router object will have a push() method that accepts a route. When
called, it will navigate to the provided route.
'use client';

import { useRouter } from 'next/navigation';
//NOTE this comes from next/navigation NOT next/router

export default function Page() {
  const router = useRouter();

  return (
    <button type="button" onClick={() => router.push('/about')}>
      About Us
    </button>
  );
}
2
3
4
5
6
7
8
9
10
11
12
13
14
The router object also has router.prefetch, router.refresh, router.back, and router.forward methods. The prefetch method works like a <Link> component with the prefetch attribute set to
true.
The router.refresh method refreshes the current route by making new server requests for the content required for the current route.
The back and forward methods navigate backwards and forwards in the browser history array.
# useSearchParams Hook for the QueryString
useSearchParams is another client-side hook that lets you read the value of the querystring and access each of the parameters and their values. It creates a URLSearchParams object.
'use client';
import { useSearchParams } from 'next/navigation';

export default function SearchBar() {
  const searchParams = useSearchParams();

  const search = searchParams.get('search');
  return <div>{/* render your component here */}</div>;
}
2
3
4
5
6
7
8
9
# redirect method for Programmatic Navigation
If you have a server-side component that needs to programmatically navigate then you can do that with the redirect method.
server-side navigation
redirect is a server-side way to create programmatic navigation.
import { redirect } from 'next/navigation';

async function fetchData(id) {
  const res = await fetch('https://...');
  if (!res.ok) return undefined;
  return res.json();
}

export default async function Profile({ params }) {
  const info = await fetchData(params.id);
  if (!info) {
    redirect('/login');
    //if no data came back from the api send the user to the login page
  }

  return <div>{/* info is available so render it here */}</div>;
}
2
3
4
5
6
7
8
9
10
11
12
13
14
15
16
17
# Route Handlers
In versions of NextJS before 13, you could create a folder called api and it would become a folder that you could use to create API end points. These folders inside api are known as route
handlers.
In the newer versions of NextJS, you can use any folder as a route handler location. Simply use a file called route.js instead of page.js. Any folder inside of /app is allowed to have either
page.js OR route.js, not both.
The
route.jsfiles are called route handlers.
Inside a route.js file you define one or more functions that you export (NOT default export). Each of these functions need to be named after the HTTP verbs.
export function GET(request) {
  //will handle GET requests to this endpoint
  //the request object is passed in
  //a response object is to be returned
  return new Response('Some content', { status: 200, header: { 'content-type': 'text/plain' } });
}
export function POST(request) {
  //will handle POST requests to this endpoint
  //the request object is passed in
  //a response object is to be returned
  return new Response('<html><body><h1>Title</h1></body></html>', { status: 200, header: { 'content-type': 'text/html' } });
}
export function DELETE(request) {
  //will handle DELETE requests to this endpoint
  //the request object is passed in
  //a response object is to be returned
  const data = JSON.stringify({ id: 123, name: 'Steve' });
  return new Response(data, { status: 200, header: { 'content-type': 'application/json' } });
}
2
3
4
5
6
7
8
9
10
11
12
13
14
15
16
17
18
19
Route.js files Return Anything
Remember that a page.js file will always return an HTTP Response containing an HTML file.
A route.js file will also return an HTTP Response, but you get to choose and control the headers and decide what TYPE of file is returned.
# Route Handler Params
Just like when you create a page.js file inside a dynamic route, you can do the same thing for a route.js file.
If you have a folder called [location] inside the api folder, then Next.js will create a props property called location which represents the segment of the URL after api. In the following code
example, notice the second argument being passed into the GET function. The first argument will always be the Request object. The second will be a params object, like the one you see in the
page.js default function.
// /api/[location]/route.js

export async function GET(request, { params }) {
  const location = params.location;
  console.log(location);
  // the value of the url segment represented by [location]
  const searchParams = request.nextUrl.searchParams;
  const query = searchParams.has('query') ? searchParams.get('query') : 'default query value';
}
2
3
4
5
6
7
8
9
The last two lines inside of the GET function are reading the value of the query param in the querystring. Say that a page.js file was making a fetch call to
http://localhost:3000/api/ottawa?query=Algonquin.
The value of location will be ottawa, and the value of query will be Algonquin.
# Caching
As a user navigates between routes, Next.js caches visited route segments and prefetches the routes the user is likely to navigate to (based on components in their viewport).
NextJS likes to cache as much as possible, by default.
You may see the Router Cache being referred to as Client-side Cache or Prefetch Cache. While Prefetch Cache refers to the prefetched route segments, Client-side Cache refers to the whole Router cache, which includes both visited and prefetched segments. This cache specifically applies to Next.js and Server Components, and is different to the browser's built-in caching, though it has a similar result.
So, on the server-side, the caching takes place for generated content as well as for fetch calls.
If you make a fetch call from either a route.js or a page.js then NextJS is going to want to cache the response. It does this to save time and network bandwidth on future calls to the same
endpoint. It also memoizes the results.
You can control this caching with the options object in the fetch call.
The cache setting has a default value of force-cache. This means that every fetch response will be cached. Alternatively, you could set the value of cache to no-store meaning that it never
gets cached.
Every response, whether cached or not, gets memoized. This means it is saved temporarily, in memory, to avoid multiple fetch calls within the same React render process.
//a server-side component
function Component() {
  let url = 'https://example.com/api/movies/search?q=star%20wars';
  fetch(url, { cache: 'force-cache' })
    .then((resp) => {
      if (!resp.ok) throw new Error('failed');
      return resp.json();
    })
    .then((data) => {
      //handle data
    })
    .catch((err) => {
      //handle error
    });
}
2
3
4
5
6
7
8
9
10
11
12
13
14
15
The { cache: ''} setting in the fetch call will be used to set the actual HTTP Response cache-control header value.
# Revalidation of Data
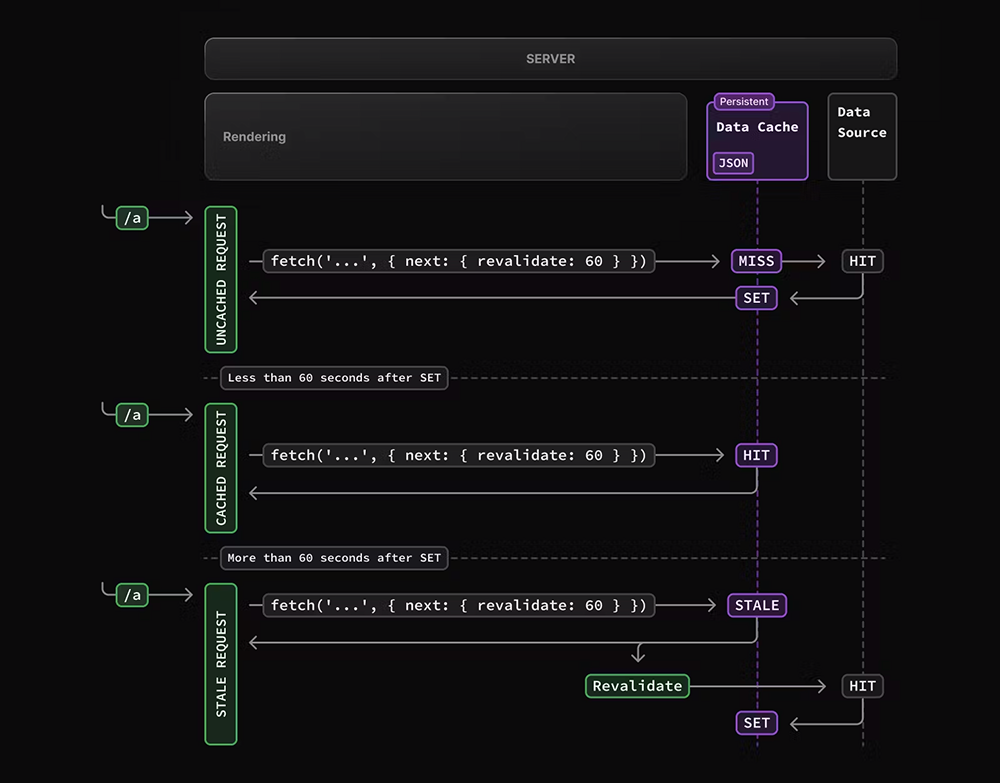
If you want to limit the caching and revalidate the contents of a response every so often then you can add a next setting in the fetch options. The next property takes an object with a
revalidate property that holds a number of seconds to wait before refreshing the response from the cache.
//a server-side component
function Component() {
  let url = 'https://example.com/api/movies/search?q=star%20wars';
  fetch(url, { next: {revalidate: 3600} })
    .then((resp) => {
      //.....
2
3
4
5
6
For a full list of the rendering and caching methods in NextJS visit this page (opens new window)
This reference is the section on routing with NextJS (opens new window)
# Caching page.js Files
So, we have seen how to control caching with fetch calls.
It is also possible to control caching for a layout.js, page.js, or route.js files. The default behaviour for NextJs when building a page.js response, is to cache the constructed file. There
are a couple properties that you can set in your file to control the server-side and client-side caching of the HTML.
// page.js
export const dynamic = 'force-dynamic';
// 'auto' | 'force-dynamic' | 'error' | 'force-static'
export const revalidate = 10; //cache page for 10 seconds, rebuild after that

export default function Page() {
  return <div>Some page</div>;
}
2
3
4
5
6
7
8
Setting const dynamic = 'force-dynamic' is equivalent to setting { cache: 'no-store', next: { revalidate: 0 } } as the options in a fetch call.
The revalidate value will control only the caching of the page. It will not impact or change any cache settings for a fetch call.
Here is the full list of Route Segment Config Options (opens new window) like dynamic and revalidate.
generateStaticParams
Next.js also has a generateStaticParams method which is used to pre-generate the HTML for different dynamic routes. For example, if you had an endpoint /[city] which would display information
about various cities. Let's say that there were 20 possible city values that would be used most of the time. The generateStaticParams method could generate the 20 versions of the HTML based on those
20 names.
https://nextjs.org/docs/app/api-reference/functions/generate-static-params (opens new window)
# What to do this week
TODO Things to do before next week.
- Read all the content from
Modules 12.1, 12.2, and 13.1. - Finish watching the React in 2021 Video Tutorial Playlist (opens new window)