5.2 Audits, Offline Status, & Service Worker Methods
# Lighthouse Audits for PWA
Lighthouse is an Audit tool built into the Chrome Web Dev tools which let's you know if your website meets all the requirements for being a Progressive Web App.
Open the Chrome Dev tools and look for the Lighthouse tab. It can run a number of tests. However, the category we want is the Progressive Web App one. Only select that checkbox and then click the
Generate Report button.
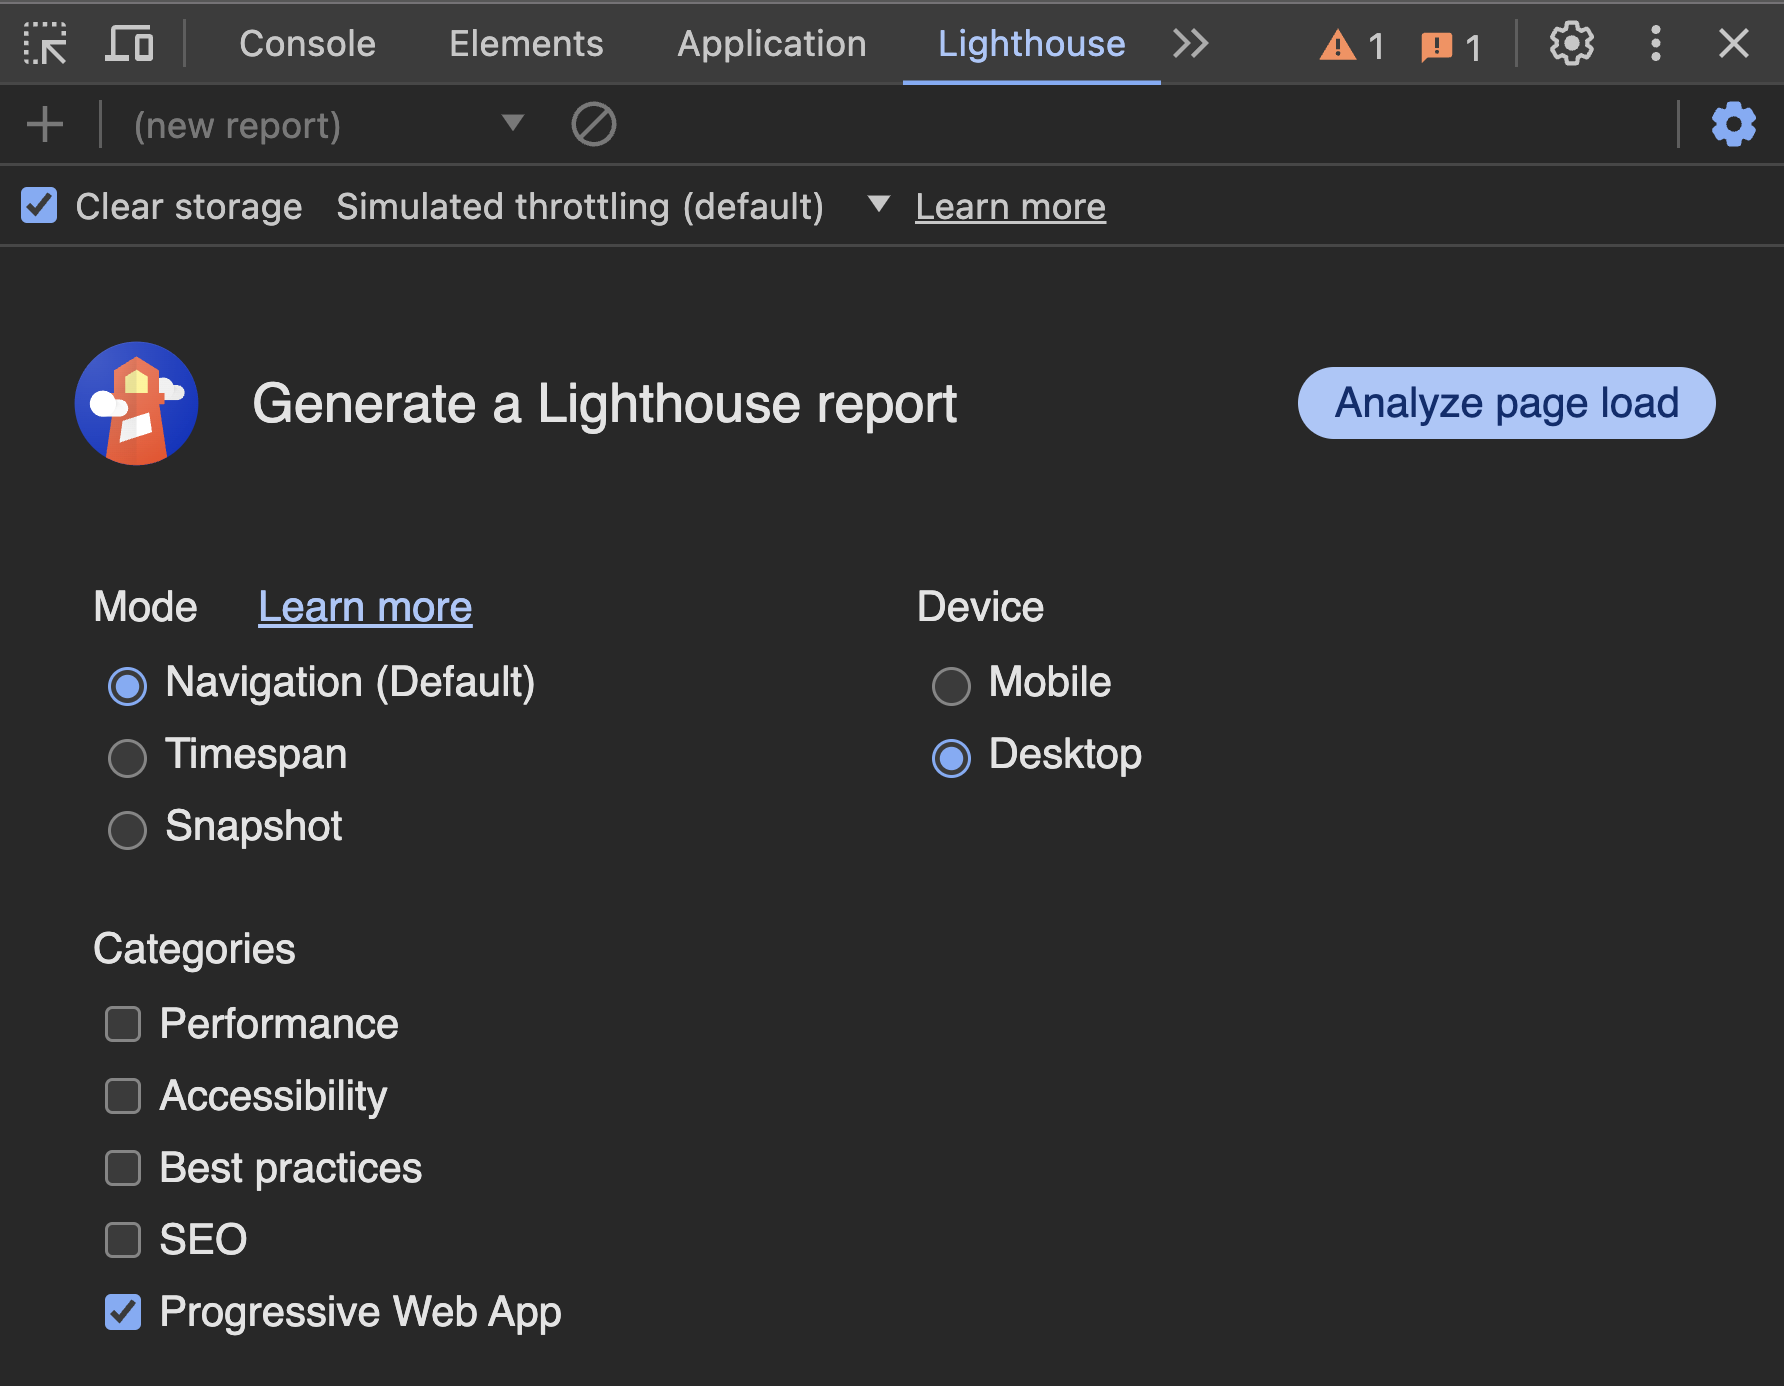
As you can see in the above screenshot, there are other options for lighthouse reports too. The Mode that you will use for nearly everything is Navigation. This asks the browser to try and navigate
through your site, like a user would.
Under the Categories heading you will see options:
- Performance: to test for loading times and interaction times. This will help with SEO and user experience.
- Accessibility: to make sure that you are meeting accessibility guidelines.
- Best Practices: a combination of factors across the different categories.
- SEO: specifically things that will help your ranking and search matching.
- Progressive Web App: testing to make sure you are meeting the requirements to install your site as a PWA.
It will take a minute or two to run the report.
The results are split into three groups.
- Fast and Reliable
- Installable
- PWA Optimized
We want green checkmarks || circles for everything!
Here is the Web.dev guide to the Lighthouse Panel (opens new window).
The official Web.dev guide to devtools and Progressive Web Apps (opens new window) can be read to understand more of the features under the dev tools
Application tab.
The Lighthouse PWA test will be removed at some point in the future, in favour of the Application tab.
Just like Service Workers, PWAs need
httpsto work but they are allowed to run onlocalhostor127.0.0.1without it.
Here is the Official Installability Requirements Guide for PWAs (opens new window).
# WaitUntil, SkipWaiting, Claim
The install, activate, fetch, and message events are all ExtendableEvents. That means we can use the ev.waitUntil() method to delay the completion of our event listener function until
after a Promise has resolved.
ev.waitUntil(
  new Promise((resolve, reject) => {
    //function that runs and does something that could take some time
    //when we are done we call:
    let result = Math.random();
    resolve(result);
    //which will pass our result back to the waitUntil method
    // as a resolved Promise object.
  })
);
2
3
4
5
6
7
8
9
10
The self.skipWaiting() method tells the service worker that it does not need to wait to be activated. It should skip the waiting phase and immediately start activating. This will trigger the
activate event listener function.
It is important to remember that the web page still will not be communicating with the new service worker. It still thinks that the old service worker is running.
This brings us to the clients.claim() method, which, if run inside the activate event listener function, will find all the windows and tabs that are currently running and tell them that the new
service worker is activated and should be referenced now.
# Offline First
The window object and the Service Worker scope, both have an online and offline event that we can listen for.
//in main.js
//listen for on and off line events
window.addEventListener('online', (ev) => {
  //tell the service worker about the change to online
});
window.addEventListener('offline', (ev) => {
  //tell the service worker about the change to offline
});

//in sw.js... although this is never practical as the sw can go to sleep
self.addEventListener('online', (ev) => {
  //this is never practical as the sw can go to sleep
});
self.addEventListener('offline', (ev) => {
  //this is never practical as the sw can go to sleep
});
//instead, in the sw.js file you will check the status inside the fetch listener
self.addEventListener('fetch', (ev) => {
  //browser has made an HTTP Request
  const isOnline = self.navigator.onLine;
  //isOnline is a Boolean indicating if the user is definitely offline
  // or is at least connected to wi-fi.
});
2
3
4
5
6
7
8
9
10
11
12
13
14
15
16
17
18
19
20
21
22
23
The online and offline event is fairly dependable for telling us that a connection to the wi-fi network has been established or lost. However, it does NOT tell us about failures for the wi-fi
network to actually get online. It also does NOT tell us if our connection is really poor. A one-bar connection to a network is still considered "online".
The default value for this can be found in the navigator object.
let isOnline = 'onLine' in navigator && navigator.onLine;
The example above, checks for existence of the onLine property and then find it's Boolean value. This property is available in BOTH the
global window scope (opens new window) and the ServiceWorkerGlobalScope (opens new window), which
inherits properties from the GlobalWorkerScope (opens new window).
It is important to remember that the Service Workers do NOT retain their state after being shut down by the browser. This is why we need to save info in the Cache or IndexedDB.
So, while we can listen for changes in the online status, it is best to check the current value in the navigator.onLine property.
As an example, let's say that you have a service worker whose fetch event listener function needs to determine the online status to choose between the cache and doing an actual fetch. The
navigator.onLine property will give us a generally good idea if we are connected to the internet. From this value we know when we are completely disconnected or if we have a live connection to a
router or wi-fi hub.
Unfortunately, it does not tell us if we have a terrible connection. We don't know if we have a 5G connection to the ISP with 1.5Gbps connection speed or a 2400 bps connection with a 1996 dialup modem. Developers will sometimes refer to this as Lie-fi instead of Wi-fi.
To solve the issue, we can attempt to reach an endpoint on some server in the most efficient way possible.
# More Accuracy Through Testing.
We can make a fetch call from either the webpage or our Service Worker that uses the HEAD method instead of GET or POST, just to see if we get a response.
Use an endpoint that is guaranteed to be available, or use a test of your own API. Have a health check route that returns minimal data or accepts the HEAD method. If you get a VALID response
from the server then that can be used as proof of being online.
async function isConnected() {
  let req = new Request('/api/alive', {
    method: 'HEAD',
  });
  return await fetch(req)
    .then((response) => {
      if (!response.ok) throw new Error('offline');
      return true;
    })
    .catch((err) => {
      return false;
    });
}
2
3
4
5
6
7
8
9
10
11
12
13
You will have to edit the above code sample to use a proper URL to test.
We can also add the check for navigator.onLine into this function.
And, if you really want to, you can add a time limit of a certain number of milliseconds without a response to treat the online test as a failure. This extra time limit step is not usually required.
async function isConnected() {
  //can only be called from INSIDE an ev.respondWith()
  const maxWait = 2000; //if it takes more than x milliseconds
  if (!navigator.onLine) return false; //immediate response if offline
  //exit if already known to be offline
  let req = new Request('https://jsonplaceholder.typicode.com/users/1', {
    method: 'HEAD',
  });
  let t1 = performance.now();
  return await fetch(req)
    .then((response) => {
      let t2 = performance.now();
      let timeDiff = t2 - t1;
      // console.log({ timeDiff });
      if (!response.ok || timeDiff > maxWait) throw new Error('offline');
      return true; //true if navigator online and the HEAD request worked
    })
    .catch((err) => {
      return false; //the fetch failed or the response was not valid
    });
}
2
3
4
5
6
7
8
9
10
11
12
13
14
15
16
17
18
19
20
21
# Launching Native App Alternative
If you have a true Native application and you want to have the user be prompted to install a platform specific native version as an alternative to your PWA then you can update the web manifest file to have the mobile device prompt the user with their choices.
We have to add the following two settings in the web manifest file.
{
  "prefer_related_applications": true,
  "related_applications": [
    {
      "platform": "play",
      "url": "https://play.google.com/store/apps/details?id=com.example.app1",
      "id": "com.example.app1"
    },
    {
      "platform": "itunes",
      "url": "https://itunes.apple.com/app/example-app1/id123456789"
    }
  ]
}
2
3
4
5
6
7
8
9
10
11
12
13
14
If there is no native alternative then omit the prefer_related_applications setting or have it set to false.
# Determine if Website or PWA
We can actually determine whether our web app is running as a basic website that has a service worker or if it was launched as a PWA.
Use the following script to determine the load context and add any custom code based on those circumstances.
//check if the app was launched from installed version
if (navigator.standalone) {
  console.log('Launched: Installed (iOS)');
  APP.isStandalone = true;
} else if (matchMedia('(display-mode: standalone)').matches) {
  console.log('Launched: Installed');
  APP.isStandalone = true;
} else {
  // console.log('Launched: Browser Tab');
  APP.isStandalone = false;
}
2
3
4
5
6
7
8
9
10
11
There is also a way that we can listen for changes to the display-mode. We can add an event listener to the window.matchMedia method.
window.matchMedia('(display-mode: standalone)').addEventListener((evt) => {
  let displayMode = 'browser';
  if (evt.matches) {
    displayMode = 'standalone';
  }
  // Log display mode change to analytics
  console.log('DISPLAY_MODE_CHANGED', displayMode);
});
2
3
4
5
6
7
8
# Enhanced Install Experiences
With a Chrome based browser we have access to that deferred install prompt event discussed last week.
When we feel that it is a good time to ask the user to install we used this code to prompt them:
if (APP.deferredPrompt) {
  APP.deferredPrompt.prompt();
  APP.deferredPrompt.userChoice.then((choiceResult) => {
    if (choiceResult.outcome === 'accepted') {
      console.log('User accepted the install prompt');
    } else {
      console.log('User dismissed the install prompt');
    }
  });
}
2
3
4
5
6
7
8
9
10
This will display the built-in install prompt.
However, other browsers have different mechanisms for allowing the user to add an app to the home screen called A2HS (install it).
We can add our own UI elements for the user to click to initiate the install. Fine for Chrome but on the other browsers we need to display instructions on how to Add to Home Screen.
On a desktop browser you can expect to see a small icon in the location bar. Here is an example of the Safari A2HS button on Safari desktop.

Note the small square with the upwards pointing arrow, on the right side of the image.
# On iOS Safari
On Safari on iOS you will see a button in the menu that is similar to the Safari desktop one. ![]() Clicking this will
give the user Sharing options dialog which includes
Clicking this will
give the user Sharing options dialog which includes Add to Home Screen.
![]()
# On Firefox Mobile
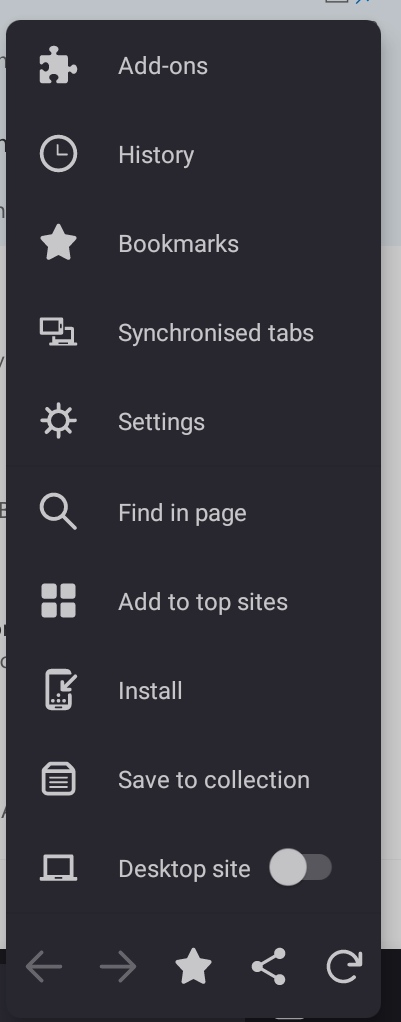
On Firefox the user can open the browser menu like the one below, and find an item called either install or add to homescreen.
Or in the location bar when on Firefox desktop:

For Firefox there may also be an Add to Home Icon in the mobile version. It looks like a small house with a plus sign. It will depend on which version of Firefox that your users are using.
# On Chrome Mobile
Similar to the the Firefox mobile menu you will find a button and label in the menu called Add to Home screen.
For Chrome, remember that you will also automatically be prompted to install a PWA if all the installation requirements are met.
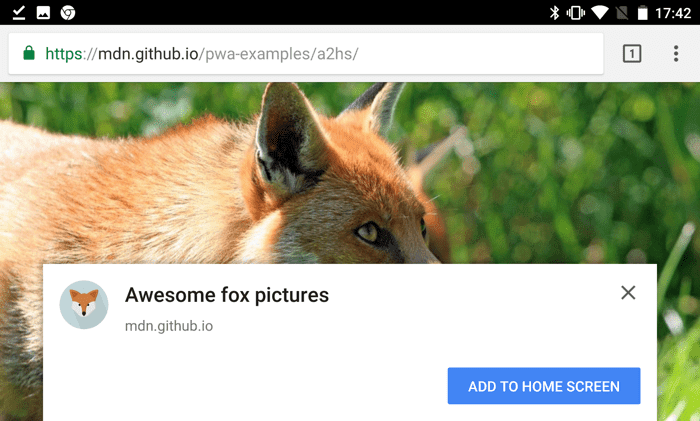
This is what the banner would look like if you were not controlling the process on Chrome with the beforeinstallprompt event code.
# How you can Ask Users to Install
There are a number of ways that we can encourage a user to install.
Remember, asking them too early will drive most people to ignore the option from that point onward.
- A simple install button on the page. Put the button in an obvious location. Be sure to add some explanatory text about what install means. You can put this button near the bottom of the page or in a location that appears after they have already interacted with some content on your site.
- An install button in the header of each page. Make it part of the navigation options.
- If you have a slide out navigation menu, put it at the bottom of the menu.
- A custom install banner. Have a look at the install banner that comes with chrome. Use this as a basis for creating your own styled banner that appears in any browser.
- A dismissible Snackbar near the bottom of the page. Try not to interfere with any task that the user would be trying to accomplish. You want to be noticeable without being annoying. Remember to wait long enough before displaying.
- If there is an ordering or checkout process in your app then having an install option here is an excellent choice. As they finish their order and you are thanking them and providing a tracking number, remind them that they can install your app and give them some reasons why they might want to.
For all of these options you have the ability to style the button to match the style of the rest of your site.
For any of these install prompts you will need to have a screen where you outline to users, who will nearly always be less technically savvy than you, how to actually install the app.
Read more about encouraging users to install on web.dev (opens new window) and more about building your own install ui (opens new window).
Read more about the install process for users on different platforms (opens new window)
# Chrome Dev Tools
If you want to learn some more about Chrome Dev Tools, this short playlist can be a good reference.
https://www.youtube.com/playlist?list=PLyuRouwmQCjm3dOz4ea90ZqMRaicX07fo (opens new window)
# ToDo This Week
To Do this week
- read all the content for modules 5.1 and 5.2
- Complete and submit Phase 2 of the Hybrid project.
- Read through the details of the Service Worker assignment.