3.2 Continuous Delivery
# Git
We will be using Git to manage all our web projects and many of our mobile projects so it is important that everyone be comfortable with how to use Git.
To create a new project:
git init
To save the remote address of the Github (or other server) version of the repo:
git remote add origin https://www.github.com/<username>/<reponame>
origin is the name that will be used to refer to the remote server. Your local repo can have a number of remote locations. Each one will have a unique name. origin is the standard convention for the primary remote location.
Every time you make changes to your code and you save a new version of your code you should record the changes in your repo.
git add -A
git commit -m "message with details about the changes just made"
2
To upload the latest commit(s) that you have made to the local repo:
git push origin main
If your remote repo is getting updated from more than one computer then you should always download the latest version of the repo before you start working.
git pull origin main
If it is the very first time you are loading a repo on to your computer then instead of pull we will use the clone command.
git clone git@github.com:<username>/<reponame> .
The period at the end means to load the repo into the current folder. If you omit the period then the clone command will create a folder with the name of the repo and download the repo into the newly created folder.
origin is the name of the remote repository and main is the name of the branch you are uploading to.
To create and switch to a new branch:
git checkout -b <branchName>
You can choose any name you want to use for the new branch. It is common practice to create a new branch for a repo when you are adding a new feature and the feature is still under development. When the code for the feature is ready then we can merge it back into the main branch.
If you were going to add a new feature darkmode to a repo and then merge it back into the main branch.
git checkout -b darkmode
We are now working in the darkmode branch.
git add -A
git commit -m "finished building the darkmode feature"
2
Changes that were made have been saved and committed to the darkmode branch. We can now push the changes up to Github where they can be merged with a pull request.
git push origin darkmode
Github will now have a darkmode branch. On Github you can go to the Pull Request tab, find the commit that you just uploaded and click on the pull request button to initiate the merge process of the darkmode branch into the main branch.
After the merge is complete we will download the latest version of the main branch.
git checkout main
git pull origin main
2
And then to delete your local copy of the darkmode branch you would use the branch command with the -d flag to name the branch you want to delete.
git branch -d darkmode
# Github
Github is the external server where we save and share copies of our repositories. It can also be the source for CI - continuous integration and CD - continuous delivery/deployment.
On the Github website, when you view the home page for your repo, the Code tab will be the default one that is displayed. The main branch is the default branch that is displayed. If there is a README.md file it will be read as HTML and displayed.
Using the README.md file to display a welcome message as well as instructions on how to use the code is a best practice.
To switch between branches, use the dropdown list from above the code list.
Two other tabs beside the Code tab which are useful are Issues and Pull Requests. The issues area is where you and other people can report and track errors and issues in your project. The pull requests section is the area that we use to manage the process of approving and merging updates to the project through alternate feature branches.
# Pull Requests
Pull Requests are the intended best practice for how to manage your repo and project on Github.
Git has a merge command that lets you try to directly merge code from one branch into another. Pull Requests are intended as a sanity check on this process. Let's say that you are the owner of a repository and you want to make your project into a open-source project. You can make your repo into a public one so that everyone can read it.
However, you don't want to let just anyone push any code that they want to the main branch.
So, people need to make a feature branch as a copy of main. They do their work in that branch and then push that branch up to repo. Now, all the code is on Github but the new code is isolated in that feature branch.
You do want other people to contribute to the project but the code needs to be reviewed before adding it to main.
You can go to the Settings > Branches area of your repository and set main as a protected branch by adding a Branch Protection Rule. Click the Add rule button, enter the name main as the pattern to match and then check the Require a pull request before merging checkbox and the Require approvals checkbox. Then click the Save Changes button.
Now other users cannot push things to the main branch and they must do a pull request that gets your approval before the code is merged into the main branch. IF there is an issue with the merge then the repo owner gets to decide how to handle the merge conflicts OR they can just reject the pull request with a message to the contributor.
In our pull request exercise your instructor has already set up a repo that has a protected main branch. This will force you to do your work through a feature branch that you push to the repo and then make a pull request.
# Github Pages
Github comes with a built-in solution for hosting static websites. A static website is one that does not need any server-side processing or dynamic rendering of content.
To activate the github pages feature your repo either has to be set to public OR your account needs to be a PRO account or an approved Educational one.
If you go to the Settings tab and select Pages from the left hand menu, you will see the option to enable Github pages.
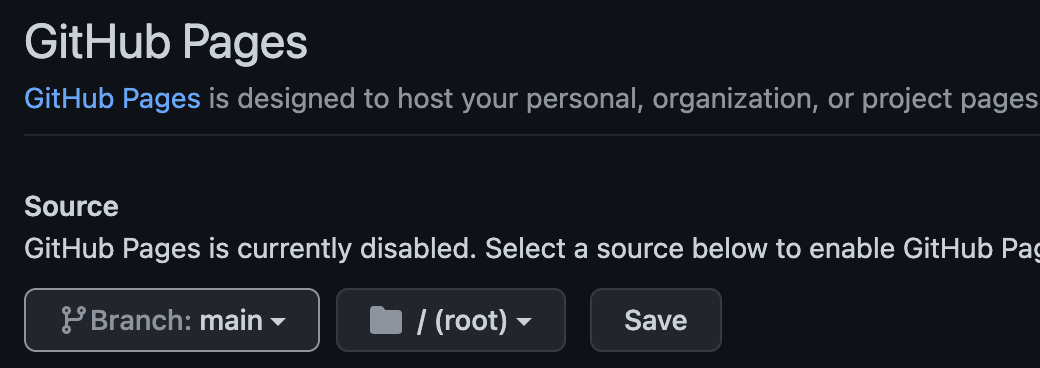
There is a dropdown list to let you pick the branch that you want to use as the deployment branch for github pages. If you create a branch called gh-pages then that branch will be used by default.
There is also an option to pick either the root folder or a docs folder as the source for the github pages deployment.
The URL for your github pages website is similar to your repo URL. If your repo URL is https://www.github.com/myusername/myrepo then your github website is https://myusername.github.io/myrepo/.
The username becomes the value for the subdomain and the domain github.com becomes github.io.
It can take a few minutes for it to appear or to get updated depending on the time of day that you are using it.
# Netlify
Netlify is a hosting service that includes a place to store server-side functions and can also be configured to watch a Github repo for updates. When the Github repo gets updated, Netlify will automatically fetch the latest code from the repo, run any configured build scripts that have been set up, and update the hosted website.
Watch for Later
You will be using Netlify as part of your Hybrid Project later this semester.
Watch to learn about Netlify Fundamentals
Watch to learn about how to connect Github and Netlify.
Watch to learn about Netlify Serverless functions.
# What to do this week
TODO
Things to do before next week
- Complete Exercise 2: Pull Requests
- Start working on Hybrid Two
- Read and Watch all the content for
3.1,3.2, and4.1 - Watch the 3 Netlify videos