# Service Workers
# Video Playlist on Service Workers
Service workers are the core technology behind building Progressive Web Apps (PWA). This video series outlines all the core things that you can do with a Service Worker and how. Each video has links in the description to a code GIST that has all the code from the video.
Here is the link to the full playlist (opens new window)
# Service Worker Intro
A service worker, at its most basic, is just a JavaScript file that runs on it's own thread. It runs independently from the scripts that you would add to your website like this:
<script src="/js/app.js"></script>
Service workers can do almost anything that your webpage script can do except access the DOM. However, they can also do some extra things that webpage scripts can't.
A service worker can be thought of as a proxy server, which is a program that runs between the browser and the web server.
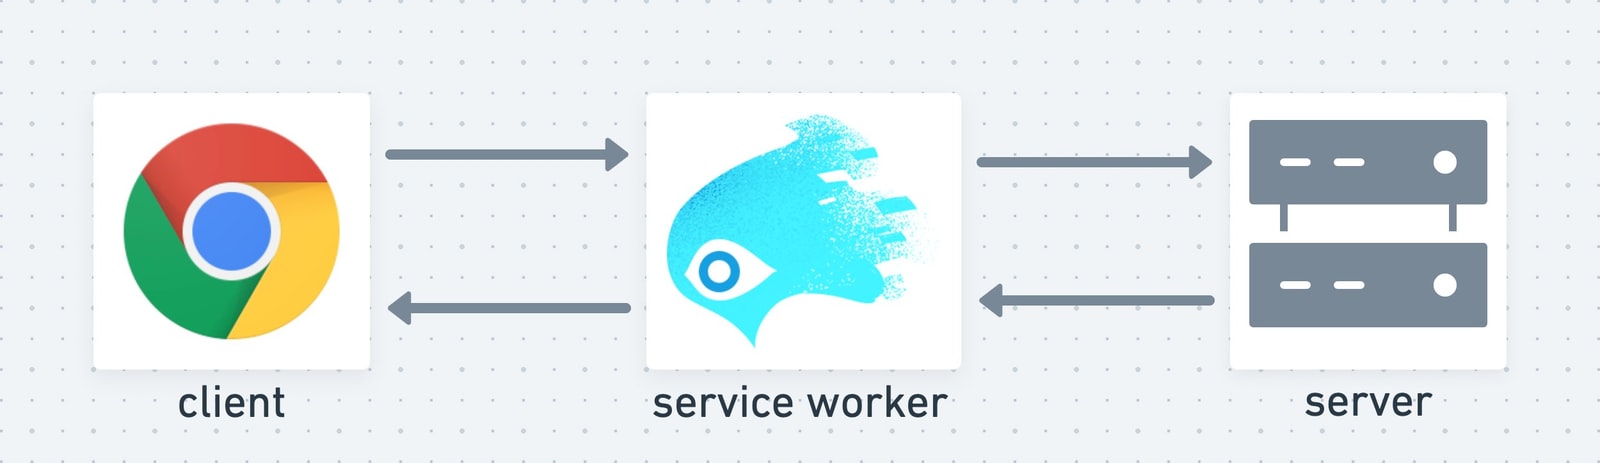
It will intercept every request for any file from the browser. We get to decide how to handle those requests. It has it's own Cache that we can use to save files. These things combined allow us to create offline-first web apps.
# Registration
We connect them to our website by registering them. We call a method to register the service worker script.
navigator.serviceWorker.register('/sw.js');
Once they are properly registered, they can communicate with every tab and window that loads pages from that same origin. An origin is a combination of protocol, domain, and port. Eg: http://www.example.com:80.
Unlike a web worker, a service worker is shared by all the currently running windows and tabs for that domain.
# LifeCycle
Service workers have four main events that they listen for.
install
activate
fetch
message
2
3
4
The service worker will run a function, which we define, after each of the events. In these functions we can access our private file cache, an indexedDB, send messages to all the connected tabs, or send AJAX calls to various APIs.
self.addEventListener('install', (ev) => {});
self.addEventListener('activate', (ev) => {});
self.addEventListener('fetch', (ev) => {});
self.addEventListener('message', (ev) => {});
2
3
4
Service workers have a lifecycle that they follow too. Since, the manner in which cached files, database access, and fetch calls are handled, can be very sensitive to the specific version of the client side script in the browser we have to be able to manage the installing and activating of these shared service workers.
installing -> installed -> waiting -> activating -> activated -> idle -> stopped -> terminated
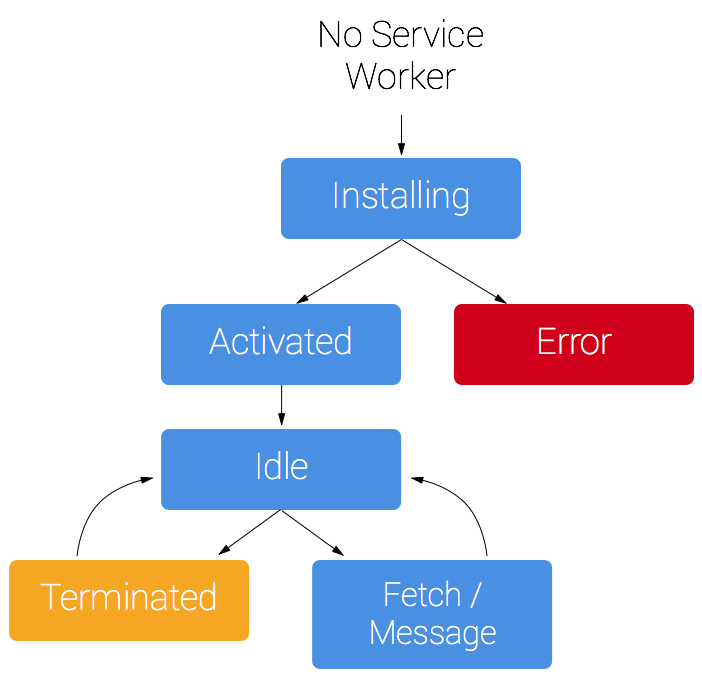
More reading on the lifeCycle (opens new window)
# Chrome Dev Tools for Service Workers
In Chrome, if you open the Dev Tools and go to the Application tab you will be able to find the tools to examine the Service Worker, Indexed DB, and File Caches. LocalStorage, SessionStorage, and Cookies can also be managed here.
In Firefox, the Service worker and the Storage features are split between two tabs in the dev tools.
In Safari, support is limited but in the Develop menu, at the top of the screen, There is a Service Worker section that lets you select an origin and then view the console and source developer tool tabs specifically for that service worker.
# Cache API
When building a cache, the main reason you would want one is to be able to run your website when the network fails or the user turns off their wifi. We want our app to be able to run offline after the initial load.
If you have a list of files that you want available if the app is offline, then you should create the cache and save those files during the install event.
// build a cache inside the install event listener
ev.waitUntil(
  caches.open('staticCache-ver2').then((cache) => {
    cache.addAll(assets).then(
      () => {
        console.log(`${staticName} has been updated.`);
      },
      (err) => {
        console.warn(`failed to update ${staticName}.`);
      }
    );
  })
);
2
3
4
5
6
7
8
9
10
11
12
13
To delete old versions of a cache, we would do this during the activate event.
ev.waitUntil(
  caches.keys().then((keys) => {
    return Promise.all(
      keys
        .filter((key) => {
          if (key != 'staticCache-ver1') {
            return true;
          }
        })
        .map((key) => caches.delete(key))
    ).then((empties) => {
      //empties is an Array of boolean values.
      //one item for each cache deleted
    });
  })
);
2
3
4
5
6
7
8
9
10
11
12
13
14
15
16
# WaitUntil, SkipWaiting, Claim
The install, activate, fetch, and message events are all ExtendableEvents. That means we can use the ev.waitUntil() method to delay the completion of our event listener function until after a Promise has resolved.
ev.waitUntil(
  new Promise((resolve, reject) => {
    //function that runs and does something that could take some time
    //when we are done we call:
    let result = Math.random();
    resolve(result);
    //which will pass our result back to the waitUntil method
    // as a resolved Promise object.
  })
);
2
3
4
5
6
7
8
9
10
The self.skipWaiting() method tells the service worker that it does not need to wait to be activated. It should skip the waiting phase and immediately start activating. This will trigger the activate event listener function.
It is important to remember that the web page still will not be communicating with the new service worker. It still thinks that the old service worker is running.
This brings us to the clients.claim() method, which, if run inside the activate event listener function, will find all the windows and tabs that are currently running and tell them that the new service worker is activated and should be referenced now.
# Storage API
If you want to find out how much storage your cache and indexedDB are taking up, we can use the Storage API to determine thoses sizes on Chrome or Firefox.
If you just want to examine the sizes of images in a cache then we can use the cache.getAll() method to get an array of Response objects. Then we can loop through those objects and get their content-length header values.
# Fetch API
The fetch API works the same way in a service worker as a fetch() call does in a script running on a webpage.
The difference in a service worker is that we are also examining files in our private caches and then making decisions about whether to return a file from a cache or to make a new fetch call.
After making a fetch call, depending on whether or not it succeeds we have to make more decisions about returning an alternate file, returning an error, or saving a new file in a cache.
# Request and Response Objects
The fetch event listener gets a FetchEvent object passed to it. Inside the FetchEvent there is a Request object.
The Request object can be passed to either a cache.match() call or a fetch() call. The return value from either of these calls is a Response object wrapped in a Promise, which means that the Promise can be passed directly to a then() method.
Both the Request and Response objects have similar structures with .url and .headers properties.
# Headers
Headers are sent with Requests and Responses to and from a Cache or a Server. Inside the Headers object is a list of individual header objects. We can access each header by its key using the headers.get method. Eg:
self.addEventListener('fetch', (ev)=>{
  ev.respondWith(
    let req = ev.request; //the Request object
    let method = req.headers.get('method'); // GET, POST, etc
    fetch(req)
      .then(resp=>{
        //resp is the Response object
        let type = resp.headers.get('content-type');
        //type could be text/css or application/json
        // or image/jpeg etc.
        let statusCode = resp.status;
        //statusCode could be 200, 404, 500, etc
      })

  );
})
2
3
4
5
6
7
8
9
10
11
12
13
14
15
16
We can use those headers to make decisions about how to handle the response from the server.
# Handling 404 Errors
When the response status code - resp.status, from the server is a 404 it means that we were able to make a fetch call but the file could not be retrieved. Browsers all have a default internal HTML file that they display when they get a 404 error. This file does not come from the server. It is in the browser.
We can replace that default browser error page with our own custom HTML file. We just need to have one in our cache that we can send back from the service worker.
If the fetch() call that you make fails because of lack of network connection or lack of wifi then your fetch will trigger the error catch. There are two places that you can catch this error in your code. Eg:
fetch(urlReq)
  .then(
    (response) => {
      //this function runs if we got ANY response
      //from the server
    },
    (err) => {
      //this function runs if the fetch had an error
    }
  )
  .catch((err) => {
    //this function runs if the fetch had an error
    //AND
    //you did not have the error handler function inside
    //the then( )
  });
2
3
4
5
6
7
8
9
10
11
12
13
14
15
16
# Communication between Browser and Service Worker
If you want to send data back and forth between the service worker and all of its controlled tabs and windows, then we need to have two things inside each webpage script and inside the service worker.
The first thing is a listener that waits for the message event.
//in the service worker
self.addEventListener('message', (ev) => {
  // ev.data is the object sent from the webpage
});

//in the webpage script
navigator.serviceWorker.controller.addEventListener('message', (ev) => {
  // ev.data is the object sent from the service worker
});
2
3
4
5
6
7
8
9
The other thing is a function to send our data. The service worker version is a little more complex because it needs to grab all the clients (tabs and windows) and send the message to each one.
//in the service worker
const sendMessage = async (msg) => {
  let allClients = await clients.matchAll({ includeUncontrolled: true });
  return Promise.all(
    allClients.map((client) => {
      return client.postMessage(msg);
    })
  );
};

//in the webpage script
const sendMessage = (msg) => {
  if (navigator.serviceWorker.controller) {
    navigator.serviceWorker.controller.postMessage(msg);
  }
};
2
3
4
5
6
7
8
9
10
11
12
13
14
15
16
# Integrating IndexedDB with Service Workers
In Service Workers we can apply everything we learned about Indexed DB.
We can use the activate event as our trigger to open and upgrade our database.
let db = null; //global db variable

let req = indexedDB.open('myDB', version);
req.onerror = (err) => {
  //error opening DB
};
req.onupgradeneeded = (ev) => {
  let db = ev.target.result;
  //create one or more stores
  db.createObjectStore('myStore', {
    keyPath: 'id',
  });
};
req.onsuccess = (ev) => {
  //successfully opened
};
2
3
4
5
6
7
8
9
10
11
12
13
14
15
16
Once you have your database open and the store created you can use either the fetch event or the message event as triggers to talk to the database.
The message event lets us get(), getAll(), add(), put() or delete() data whenever a webpage needs it.
The fetch event lets our Service Worker make decisions about whether it needs to make a call to an API before inserting or reading data. You could receive a fetch call from the browser for some new API data. The Service Worker can look for a match in the indexed DB and if it doesn't find one THEN make the actual API call for new data. The new data can be then both saved in the database AND returned to the webpage.